Since Excel is a spreadsheet application, a label is a text in a cell, describing data in the rows or columns surrounding it. For one to create and print the mailing labels, you must first prepare the worksheet data in Excel, and then use Word to configure, organize, review, and print the mailing labels.
Procedure
Prepare the address list in Excel for mail merge and Set up the mail merge document in Word
1. In Microsoft Word, create a new document or open an existing one. The currently opened document will become your label's main document.
2. Head over to the Mailings tab > Start Mail Merge group and click Step by StepMail Merge Wizard. This opens the mail merge.
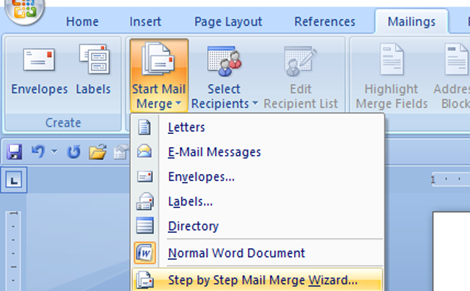
3. Select Labels and click the Next: Starting document link near the bottom of the Mail Merge pane.

4. Decide where you want to set up your mailing labels – in the current document, some other existing document or a new document.
5. Connect the address labels to your Excel mailing list
- Choose to Use an existing list under Select recipients.
- Click the Browse button and locate the Excel worksheet you want to use.
- If you have given a name to your address list, select it and click OK. Otherwise, select the whole table, you will be able to refine, sort or filter the recipients to include in the mail merge later.
6. Select the recipients to include in the mail merge
- The Mail Merge Recipients window will open with all the recipients from your Excel mailing list selected by default.
- To exclude some of the recipients, clear a check box next to their names then click OK.
- When you are finished refining the recipients list, click NextandArrange your labels.
7. Arrange the layout of your address labels
- In the main Word document, click where you want to insert a certain field and then click the corresponding link on the Mail Merge pane. Typically, for mailing labels you would need only the Address block merge field.

- The InsetAddress Block dialog window will open. Select the desired options, check the result under the Preview section and click OK.
- When you are finished with refining your Address Block, click OK, and then Next; Preview your labels.
8. Preview your mailing labels
- Click the left or right arrows on the Mail Merge pane or Preview Results ribbon group to see how your mailing labels will look like when printed.
- If you want to change the labels' font type, font size, font color or make any other changes, switch to the Home tab and design the currently previewed label to your liking. The edits will be automatically applied to all other labels.
- When you are satisfied with the appearance of your address labels, get back to the Mailings tab and click Next: Completes the merge.
9. Print address labels
- Simply click Print… on the Mail Merge pane or Finish & Merge > Print documents on the ribbon.
- Decide whether to print all of your mailing labels, current or selected ones.