Diverse methods were discussed in our last write-up on how to change dates into texts. In this article, the reverse will be discussed, i.e., changing dates to texts in Excel. In doing this, we will look at some formula methods as well as some non-formula methods.
The TEXT function of Excel is uniquely built to change numbers to text and showcase it in the style or format you want.
The syntax of the function includes:
TEXT(value, format_text)
Where:
Value: stands for a number you intend to change to text. Value could also be a number, a formula that returns a numeric value, or a reference to a cell containing a number.
Format_text: This means how you intend to configure the text supplied as strings encased in quotation marks.
For instance, this formula can be used to change the date in Cell A1 to text strings in the local date format in the US (month/day/year):
=TEXT(A1,"mm/dd/yyyy")
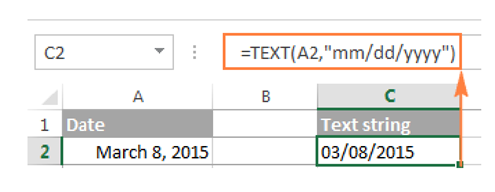
As clearly shown in the above screenshots, the result of the text formula is placed on left-alignment, which stipulates that it is configured as text. A few other signs exist to show the difference between a date string and a text string in the spreadsheet.
Example 1. Using other formats or approaches to change the date to text strings.
The TEXT function has no issues with changing dates to text values since these dates are serial numbers in nature. The main challenge is to know the right format to use in doing this.
The Excel spreadsheet is conversant with the following codes:
1. Months:
m – month number without a leading zero
mm – month number with a leading zero
mmm – short form of the month name, for example, Mar
mmmm – full form of the month name, for example, March
mmmmm – month as the first letter, for example, M (stands for March and May)
2. Days:
d – days number without a leading zero
dd – day number with a leading zero
ddd – abbreviated day of the week, for example, Sun
dddd – full name of the day of the week, for example, Sunday
3. Years:
yy – two-digit year
yyyy – four-digit year
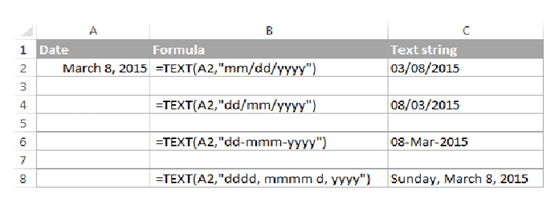
You can make use of different signs, e.g., dash(-), slash (/), comma (,), colon (:), etc., in order for the configured text date to appear the way you would love it to. Below are some examples:
"mm/dd/yyyy" – the date format used in the USA, displays as 03/08/2015
"dd/mm/yyyy" – the date format used by the rest of the world, displays as 08/03/2015
"dd-mmm-yy" – displays as 08-Mar-15 to avoid any confusion : )
"dddd, mmmm d, yyyy" – full date, including the day of the week, displays as Sunday, March 08, 2015
If you have a column of US dates in Excel, for instance, and you have to transfer them to a .CSV file in order for your users in the UK to have access to it, all you need do is to configure the date to the format used in the UK, in the form of a courtesy:
=TEXT(A1,"mm/dd/yyyy")
More examples and outcome that has to do with formula methods can be viewed below:
Example 2. Changing time to text strings
In a situation where you see time and date shown in your date entries, and you desire to convert them to text strings in the same way as you saw them, you use these time codes in the format_text argument of the TEXT function in Excel.
1. Hours:
h – hours without a leading zero, as 0-23.
hh – hours with a leading zero, as 00-23.
2. Minutes:
m – minutes without a leading zero, as 0-59
mm – minutes with a leading zero, as 00-59
3. Seconds:
s – seconds without a leading zero
ss – seconds with a leading zero
Periods of the day:
AM/PM – displays as AM or PM
If there are no specifications, you make use of the 24-hr time format.
Please take note of the months as well as minutes; make use of their code. It is so amazing how the Excel spreadsheet is able to detect the difference between them. Now, if you insert "m" exactly after the hours (h codes) or before seconds (s codes), Microsoft Excel will come to the comprehension that wants is to be shown is minutes and not the month. Yeah, it is as easy as that.
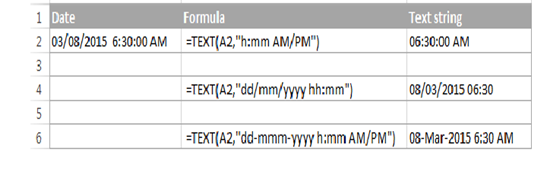
The TEXT function in Excel enables both date and time codes in the format text argument, for example:
=TEXT(A2,"dd/mm/yyyy hh:mm")
If you intend to change only the time portion, you have to input just the time code;
=TEXT(A2,"h:mm AM/PM")
The outcome may be something to what you see on the screenshot below: